
|
 08-07-2011, 11:27 PM
|
#21 |
|
G8 Specialist

Join Date: Jun 2009
Location: Phoenix
Posts: 7,799
|
I like your paint scheme on that body, will look good!! Keep the pictures comin. we love em. And your ideas!
 And thats what wives are supposed to do!! Don't ya know?  |

|

|
 Today Today
|
|
|
__________________
This advertising will not be shown in this way to registered members. Register your free account today and become a member on Buggies Gone Wild Golf Cart Forum |
|
|
08-22-2011, 10:43 PM
|
#22 |
|
Gone Wild

Join Date: Apr 2010
Location: Latonia KY
Posts: 604
|
not a whole lot of pic worthy stuff to show but I have been busy. doing some finish welding and dressing the welds in. i ran out of wire tonight (again). so far i have melted 2 rolls of wire on this project. I still have some fab work to do like my dash and shifter. i am hoping to have a good weekend and knock some of this out. don't worry I will take pics along the way!
Arin |
|
|
|
|
06-19-2012, 05:54 PM
|
#23 |
|
Gone Wild
Join Date: Apr 2010
Location: Latonia KY
Posts: 604
|
Well guys, I have been around when I can to read up and post up, but unfortunately time to work on the cart has been limited. Now we are getting to vacation time and the wife has given me free reign to put all my non work time to getting the cart done to take to Myrtle beach. Funny how it's not a big deal to her until it's something she wants. LOL.
So I have been a busy guy the last week or so. My oldest son has been a big help over the last week, he's got the body ready for filler and real close to paint. and he's been helping me with the mod work to the ol' melex. Getting you to speed, here's what I have been up to...... after a lot of research on what to do to get speed out of the old boy, it was found that the old resistor stuff wouldn't get it. I got looking at upgrades, and parts replacements and read up on the kit from Scotty B. But unfortunately it wasn't in the budget to spend that much and have money to finish the cart. So I kept digging, and lucky for me I was able to pick up a 98 EZgo that has been wrecked. the frame was bent, body was gone but everthing else was good. I loaded it up and brought it home for $185. Now comes the fun, retrofitting the EZGO drive train in the the Melex. When you last saw the Bumble bee he looked like this...... 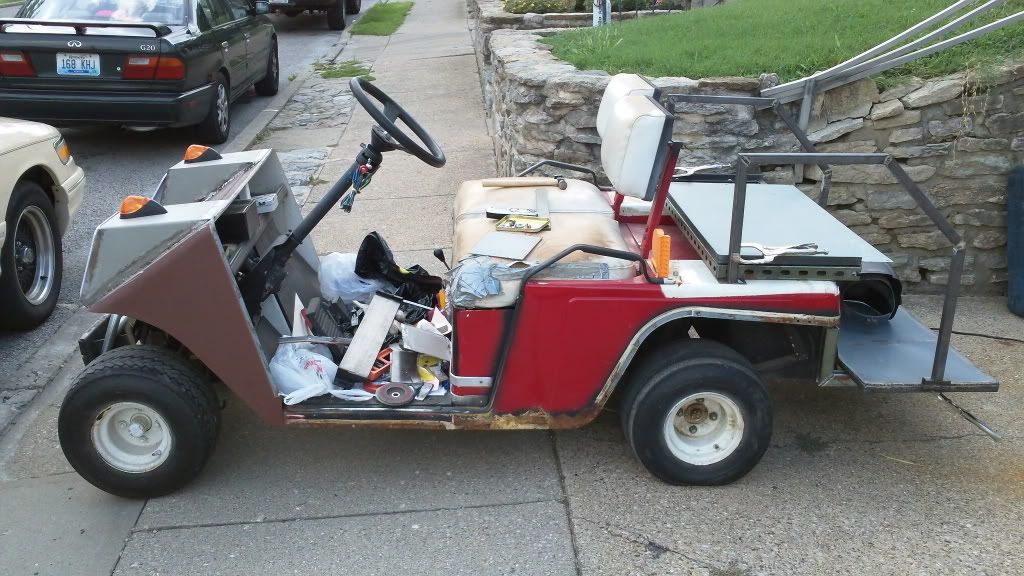 I got to work and started removing the rear axle and motor setup. 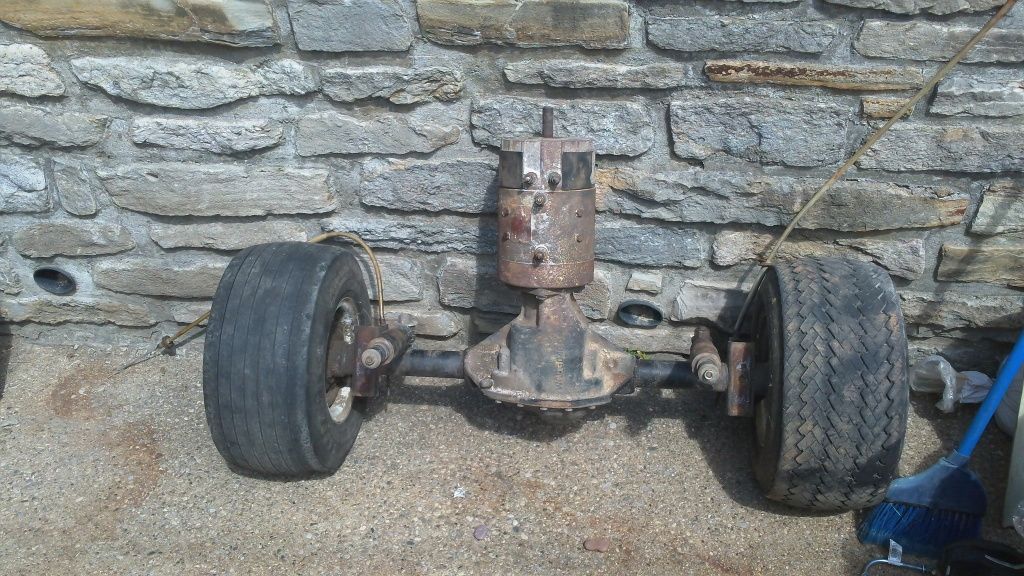 Got the "new" axle ready to put in the cart. 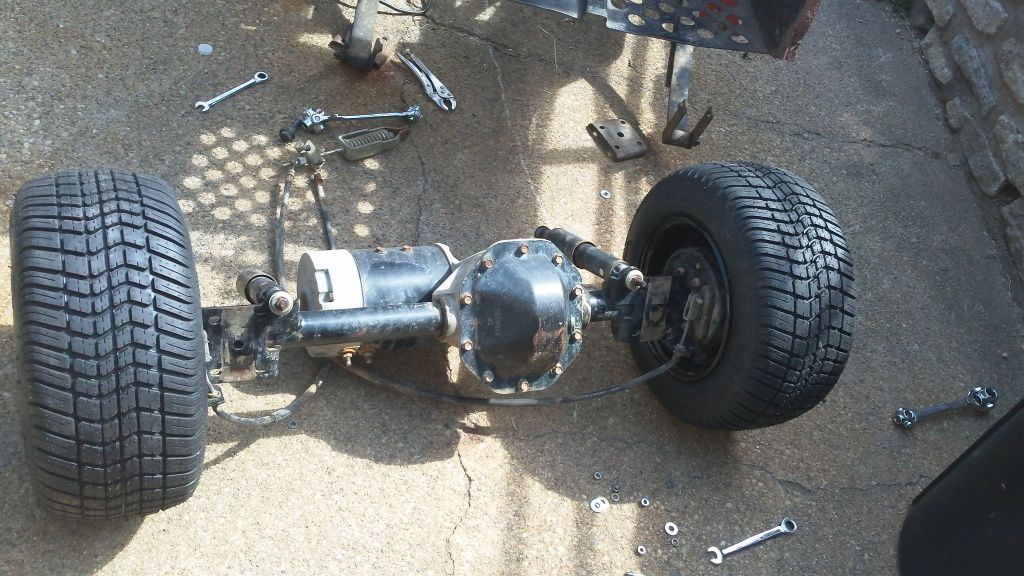 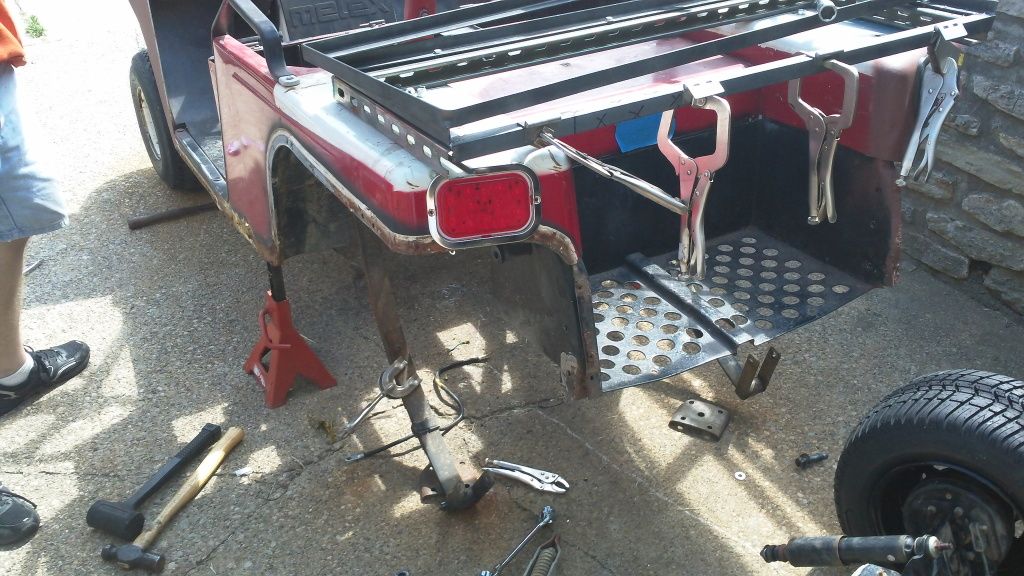 Once in place I found that the axle perches weren't in the right place to mount in the melex so I cut them off and made up new ones. After several trips in and out of the cart we got the perches where we wanted them, clocked the axle for proper placementin the frame for suspension travel and tacked it in place. we then took it out for the last time and burned in the perches for good. Here's the shots of the axle in its new home. 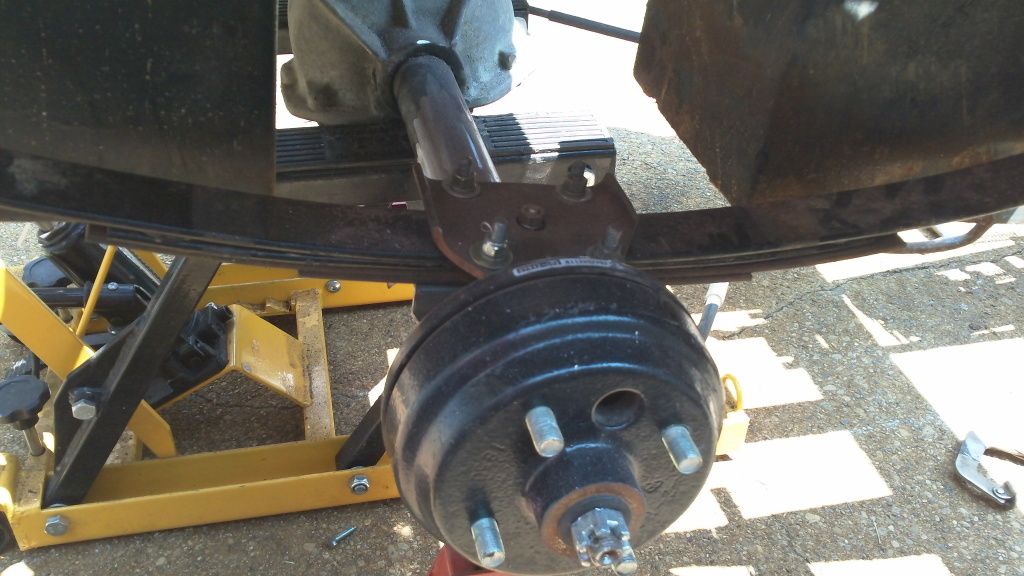 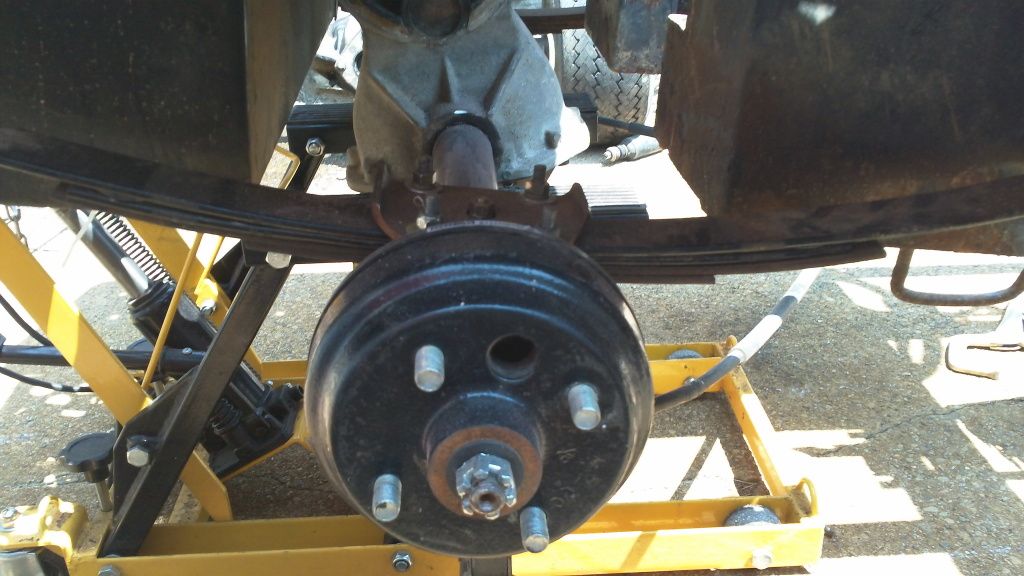 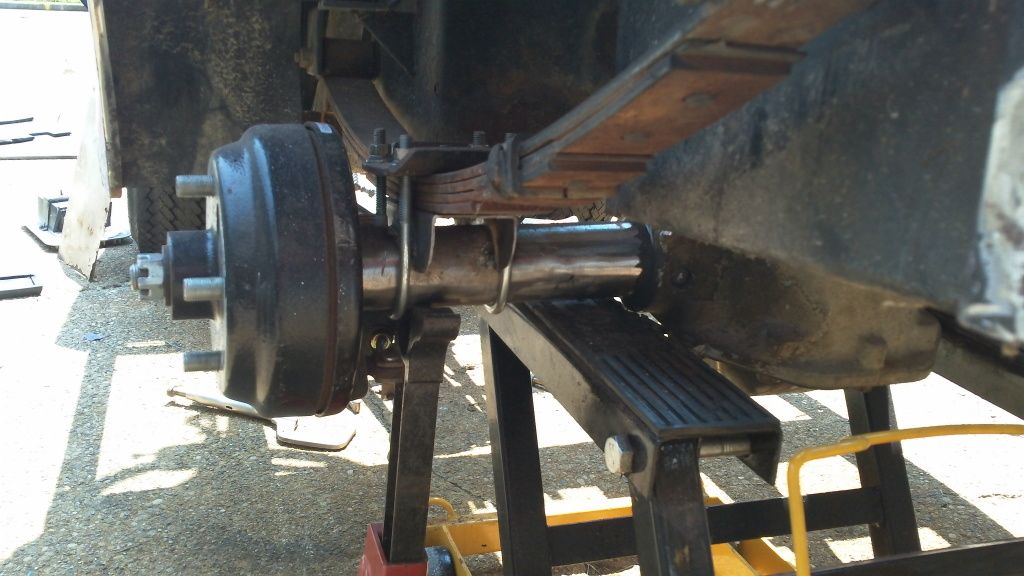 I then turned my attention to the pedals. I removed the old swipe board, rods and pedal assembly, then made a couple of cuts to the supports to make room for the new EZGO Pedal. Once in place It was found that the Melex Brake arm set up would have to be modified to allow the EZGO set up to work. Luckily the EZGO Brake cables, and spring connection hooked right up to the Melex pedal. I did have to add a couple pieces of angle iron to help mount the pedal, but other wise it was a simple install. 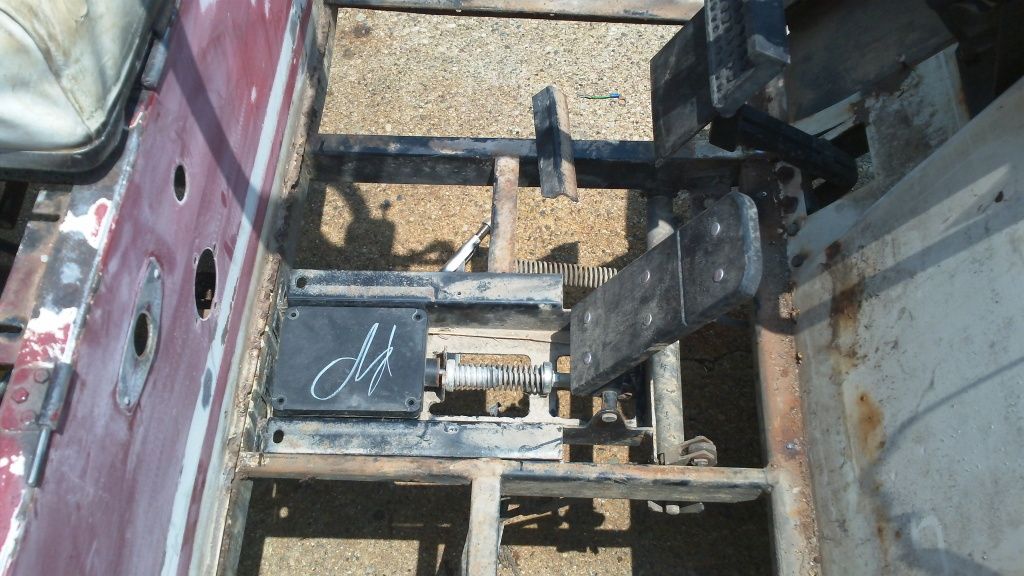  Next up was the install of the shifter. This took a little bit of time due to me not paying attention to all the moving parts. I found the EZGO rod that I was going to use for the shifter was deflecting and letting me shift the cart fully in to gear with my shifter. After some trial and error and the help of the post from Cheesy, I created my own shifter set up. I used a Hurst Indy shifter handle, some angle brackets, a turn buckle and modified the F-R bracket and I now have a "Jake's" Style shifter with less than 20 dollars invested. I then did a trial fit and some "mock runs" to check shifter placement and ease of movement. 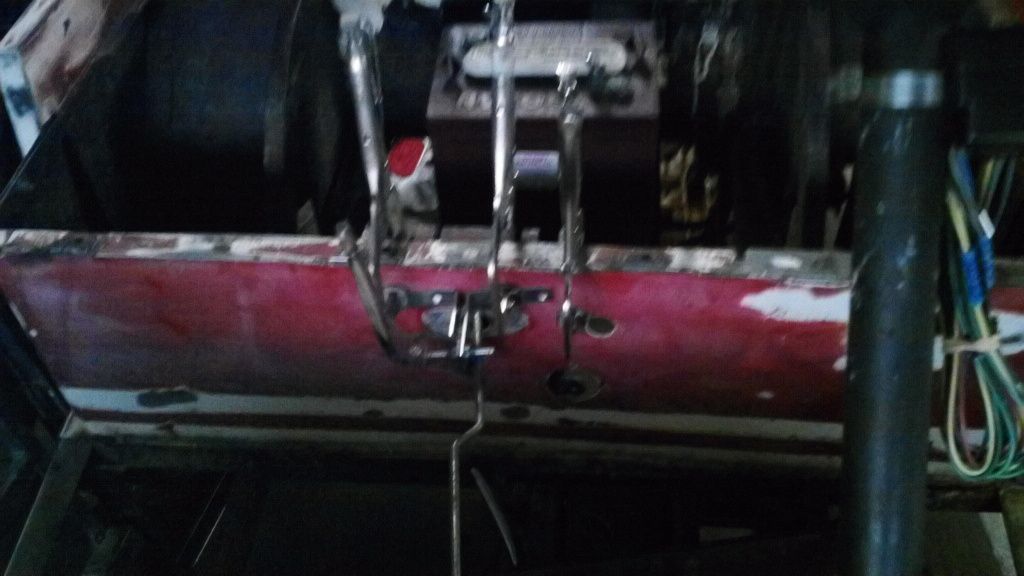  Through the mock runs I found a little wiggle in the shifter handle. I noticed one of the holes was wollowed out so I found a 5/16 nut and created a bushing. 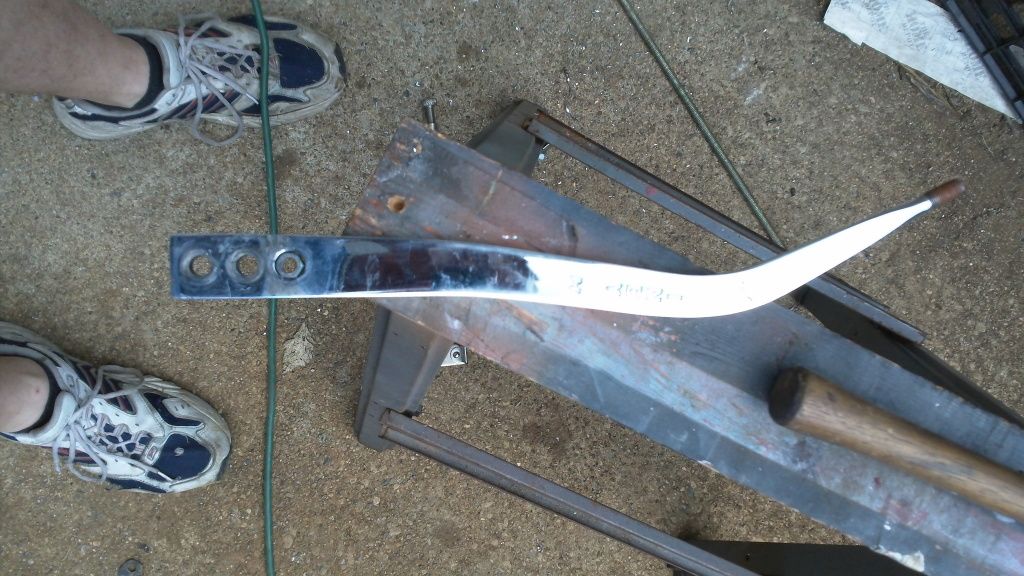 I drove it in to the hole. 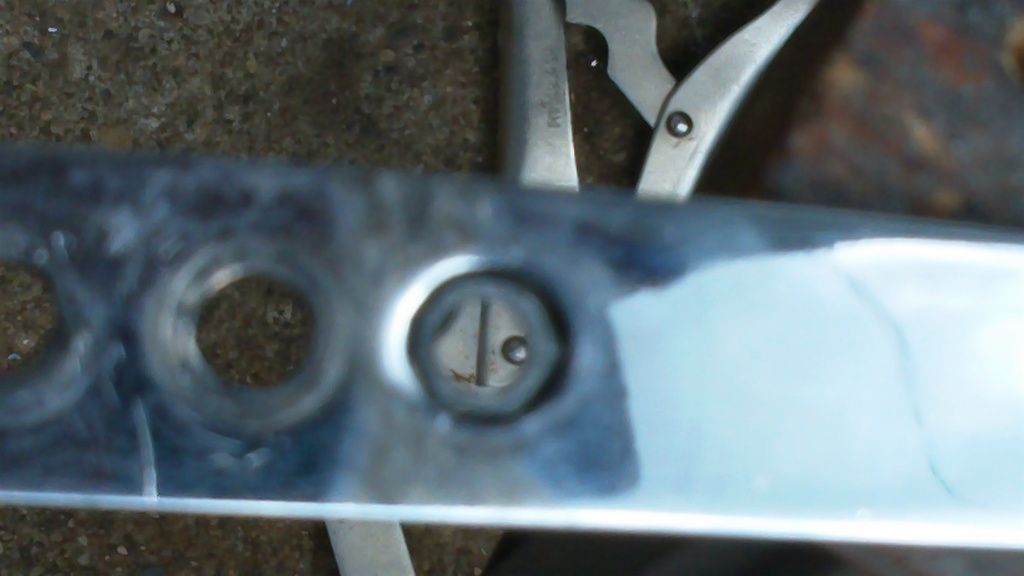 Once I had it in flush, I then took a drill bit and drilled out the threads. the bolt then slid thru and no more wiggle. with that done I drilled the holes and bolted everthing in. 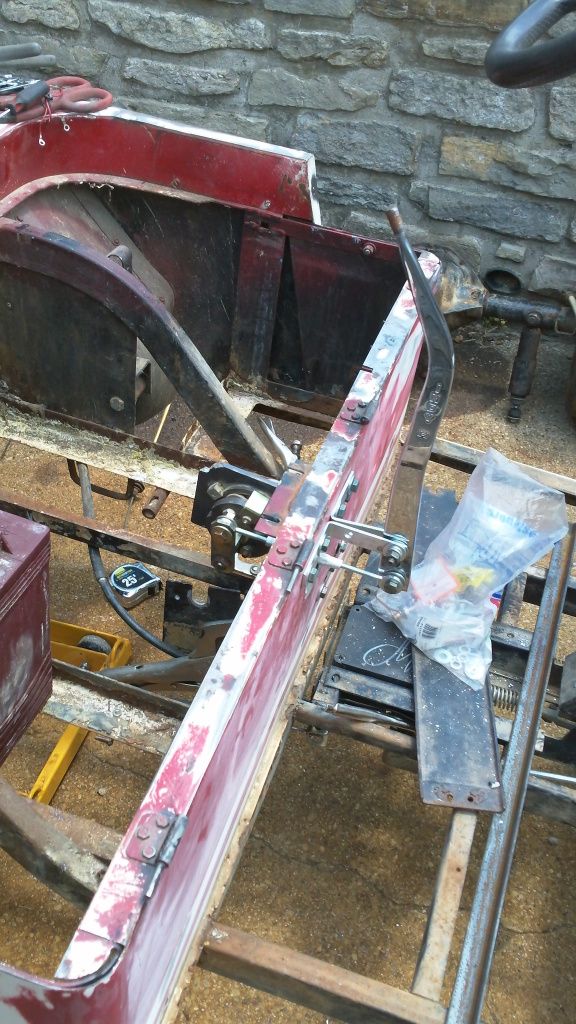 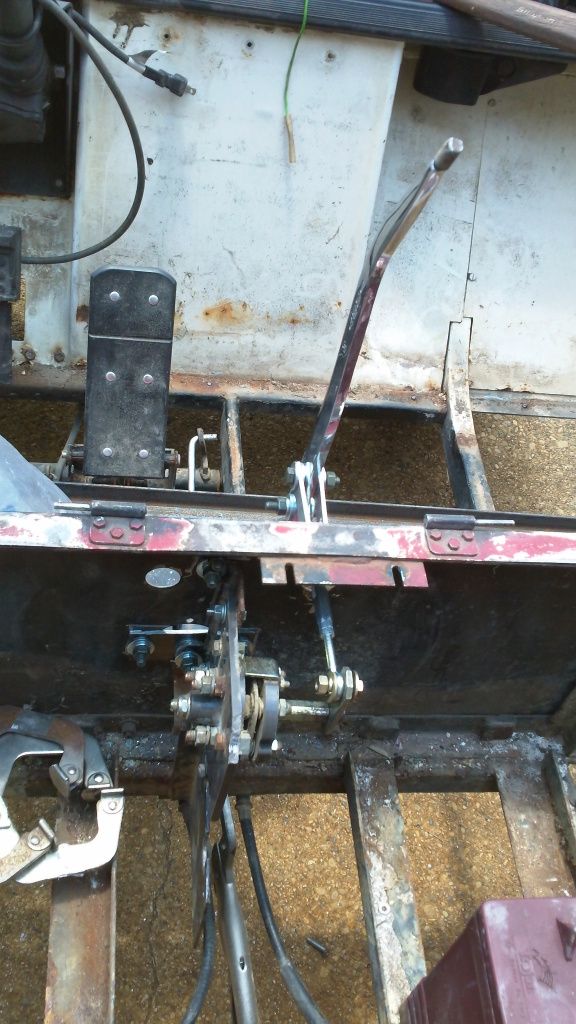 Along with this, (the stuff I dont' have pictured): I have the rear seat kit complete ready for paint and bed liner. body is sanded ready for bondo. New top is ready to install. Radio, speakers, amps and fuse box all purchased and ready to go. Next step is to fab up a dash. I have 2 options. One, take and cut and modify a metal ford truck dash I have on hand to fit the Melex front end, or two, fab a totally new dash. I will keep you posted, I hope things move fast. Last edited by BumbleBee; 06-19-2012 at 06:04 PM.. Reason: wrong pic code. |
|
|
|
|
06-19-2012, 06:17 PM
|
#24 |
|
Gone Wild

Join Date: Oct 2010
Location: Lawrenceburg Ky.
Posts: 1,771
|
BumbleBee Is Latonia in Kenton Co.?
Got a speeding ticket there once. Was not a happy day! Looks like you have a lot of work (FUN) to do good luck on your build. Good to see someone else from the Great State of Kentucky. |
|
|
|
|
06-19-2012, 09:08 PM
|
#25 |
|
Gone Wild
Join Date: Apr 2010
Location: Latonia KY
Posts: 604
|
Yep. Latonia is in Kenton Co. and it's never a good day to get a ticket. It's a lot of work but you're right it is fun. I will keep you posted on how much fun I am having.
Remember us Briars have to stick together. |
|
|
|
|
06-20-2012, 05:39 PM
|
#26 |
|
Gone Wild
Join Date: Apr 2010
Location: Latonia KY
Posts: 604
|
OK Kids,
Back at it again to day. another fun filled day of fabrication! It was time to start on the Dash. I had originally thought I would fabricate my own dash, but every Idea I had was plain. I thought well if I was going to just create a plain dash, then use a stock one. I went out and removed the one from the parts cart I bought and tried to fit it. No luck. no matter what I did the EZGO dash would not go in the cowl and look right. Then I sat and got to thinking. I then spy this Dash board I have as an extra from a pick up project. 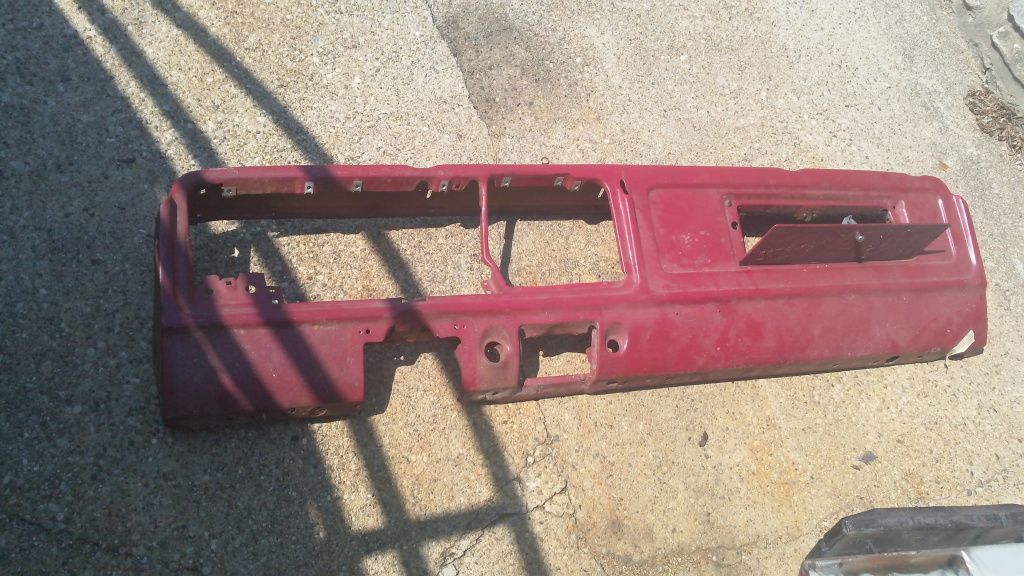 it's a dash from a 70's Ford Pick up. I took some wire and bent it around the corners of the dash, and then took the wire and laid it on the corner of the cowl and wouldn't you know it, it was a near perfect fit. So I grabbed a roll of tape, tossed the dash on my portable work bench and got to cuttin'! First cut off was the left corner including the factory headlight and wiper mounts. with it freed, I test fit in on the cowl. 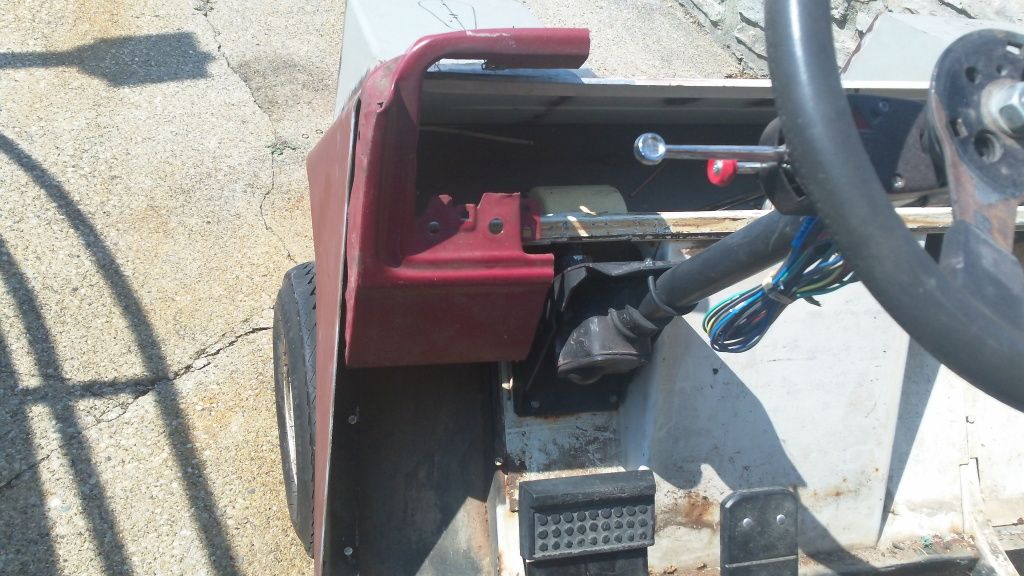 Next went the right corner and test fit it. 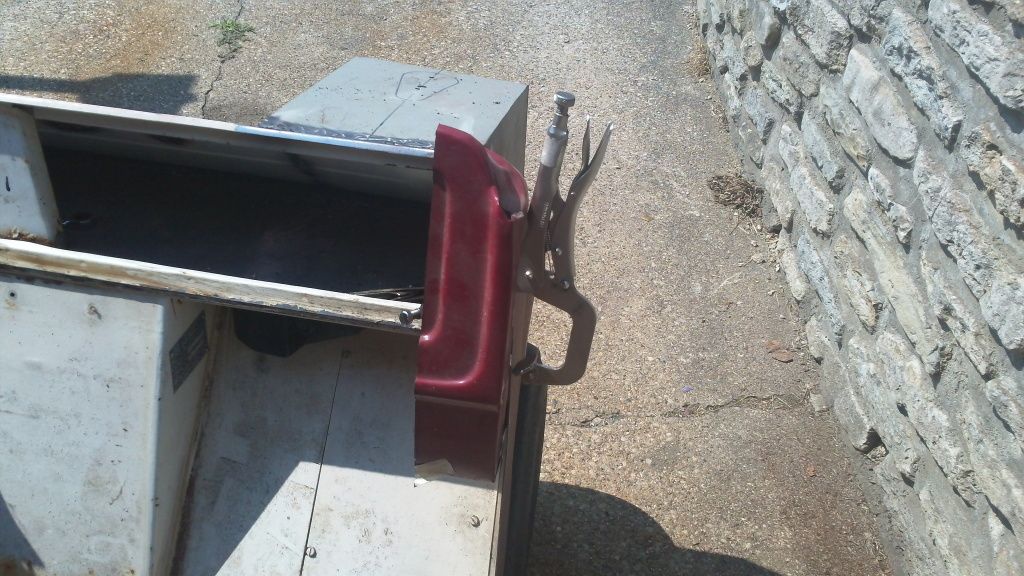 I then took some measurements and found the best place to lay out the glove box. ended up cutting out 3 inches from the right side and put in in place. 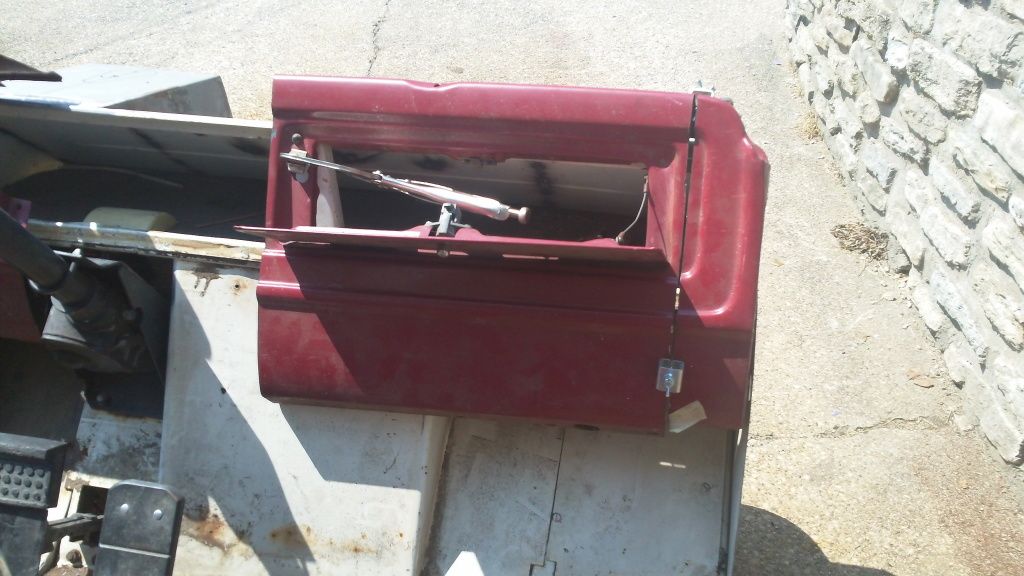 Then I got crazy and cut up the rest of the dash eliminating the ashtray, part of the instrument cluster area and the steering column mount. I did keep the cigarette lighter whole as it will be the new home for the keyswitch. Once test fit on the cart I pulled it off and set if up on the bench and started tacking things together. 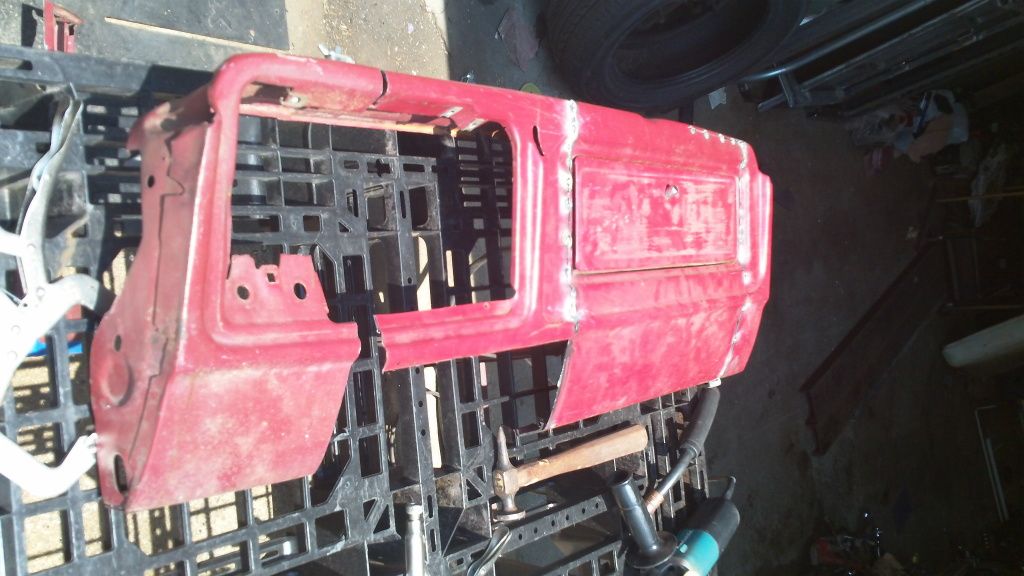 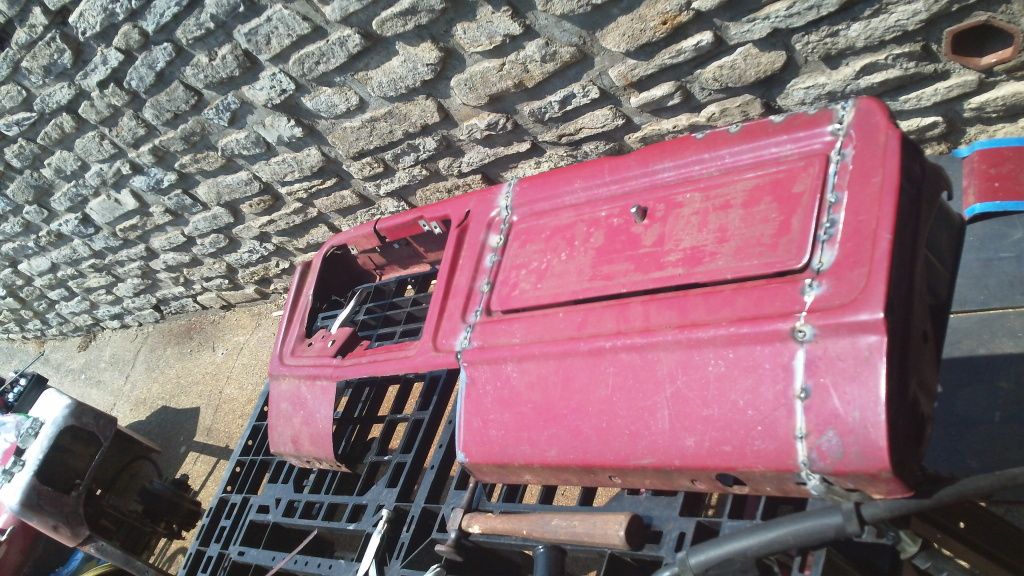 Once I got a bunch of good tacks on everything I test fit it on the cart. 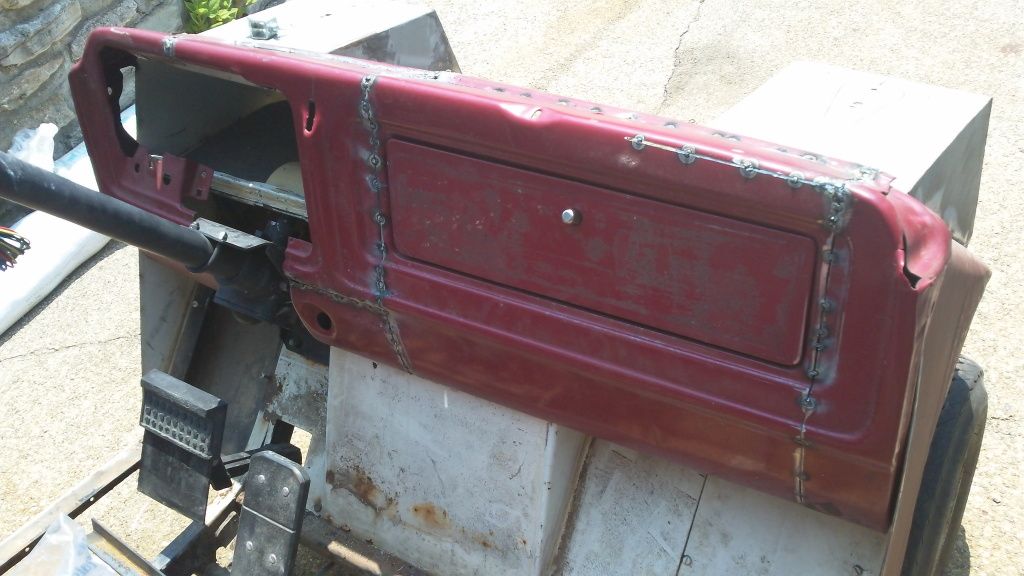 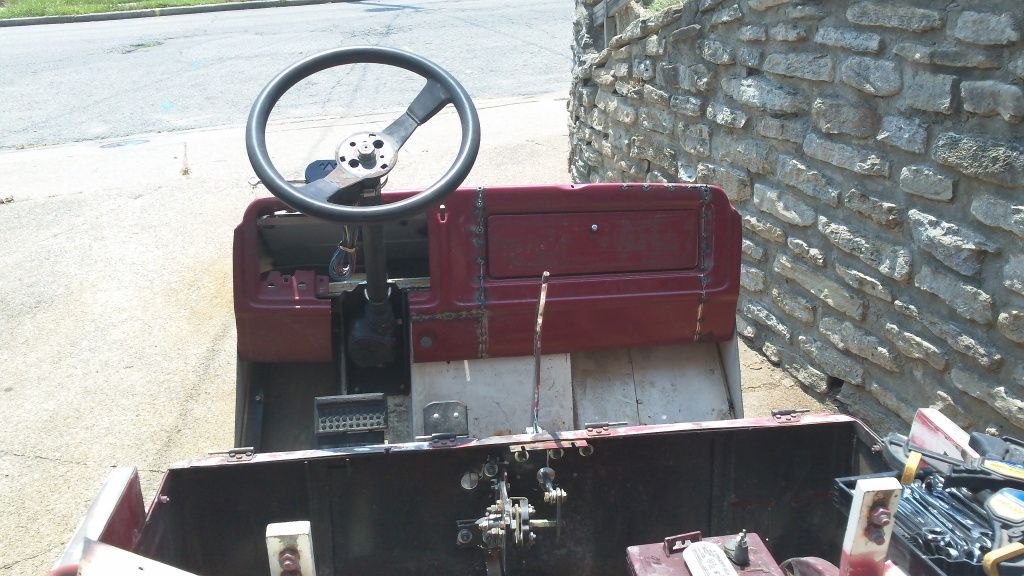 Got a couple of braces to make and then add my radio and guages. should work out pretty good. it's amazing what you can do with 3 and a half hours and a free dashboard. Tomorrow time to replace the battery tray. Wish me luck!! |
|
|
|
|
06-21-2012, 07:05 AM
|
#27 |
|
Gone Wild
Join Date: Feb 2008
Location: Anderson, IN
Posts: 535
|
looking good so far!
|
|
|
|
|
06-21-2012, 08:16 AM
|
#28 |
|
Not Yet Wild
 Join Date: Nov 2011
Location: Temple/Killeen, Texas
Posts: 66
|
Wow!! Very cool fab work. I may have to steal some of your ideas.
|
|
|
|
|
06-21-2012, 09:07 AM
|
#29 |
|
Admin/Moderator
Join Date: Dec 2006
Location: Ohio
Posts: 18,055
|
Nice work!
Glad to see you back at it. |
|
Ron
 PLEASE VISIT Our Sponsors * BGW GEAR The Store The G2 Project * Swing Arm Drop & Repair * Geep1 Project |
|
|
|
|
|
06-21-2012, 09:12 AM
|
#30 |
|
Feral
Join Date: Feb 2011
Location: Central Miss
Posts: 1,931
|
I just drulled,.............
|
|
|
|
 |
|
||||||
|
|
 Similar Threads
|
||||
| Thread | Forum | |||
| want fix up my 212 melex | Electric Club Car | |||
| melex | Golf Carts and Parts | |||
| Melex 512 | Electric golf carts | |||
| melex wants to go , go .go ....... | Melex | |||


 Linear Mode
