
|
|
|||||||
| Extreme DC! Extreme Electric Golf Carts! |
  |
|
|
Thread Tools | Display Modes |
 05-11-2010, 11:06 PM
|
#1 |
|
Not Yet Wild
Join Date: May 2010
Location: Paducah, KY
Posts: 55
|
I just installed a new DCX500 on my 02 EZ-Go PDS, with new Crown 8V batteries. I could have something wrong, but not sure. When the key is turned on, it shows a solid green light. When the accelerator is pressed it tries to move for a split second, then the controller stops and flashes red 6 times. That's undervoltage, according to the manual. I checked voltage across each battery, and for the total bank. 8.3X for each, and somewhere around 50V for the bank. Again, new batteries just bought today, and a new controller straight out of the box.
Any ideas? 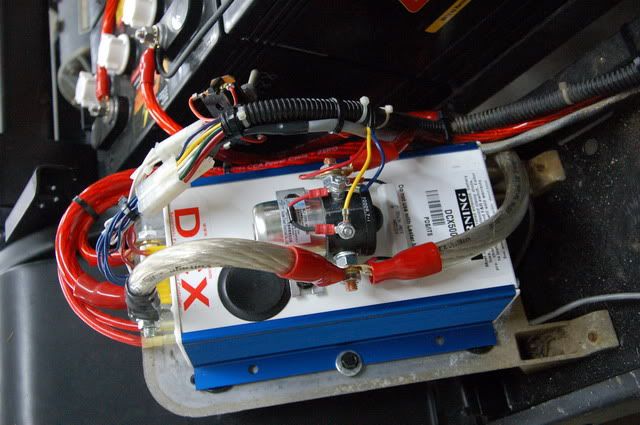  I also added a 48V state of charge meter. This cart was originally 36V, and only had teh f/r switch and key on the panel. Not quite understanding the schematic on this one. Should I just run the terminals marked red and black back to the batteries where the bank is read? 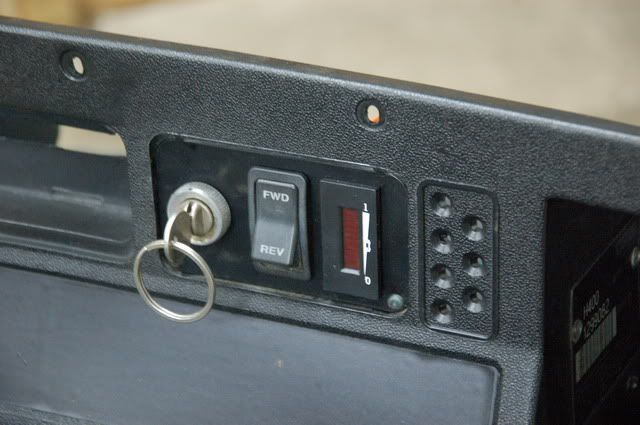 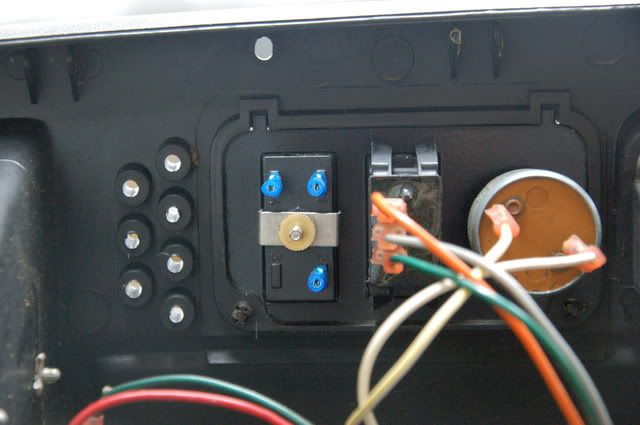 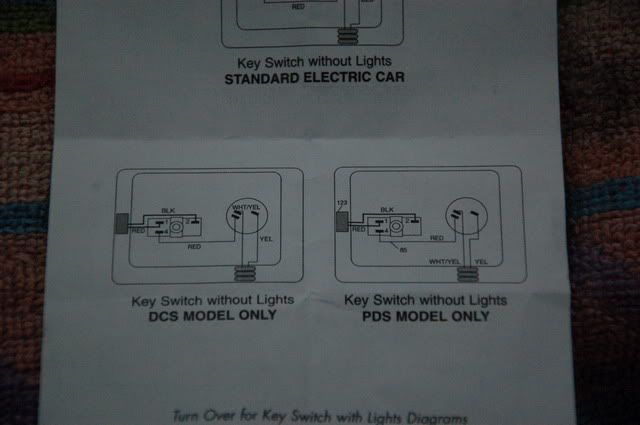 |

|

|
 Today Today
|
|
|
__________________
This advertising will not be shown in this way to registered members. Register your free account today and become a member on Buggies Gone Wild Golf Cart Forum |
|
|
05-11-2010, 11:19 PM
|
#2 |
|
Happy Carting

 Join Date: Dec 2007
Location: Southern California
Posts: 73,406
|
That is a programmable controller. could the under-voltage cut off be set too high?
|
|
|
|
|
05-12-2010, 09:40 PM
|
#3 |
|
Not Yet Wild
Join Date: May 2010
Location: Paducah, KY
Posts: 55
|
With support from the place I bought the controller from, the controller issue is resolved. I had the diode in backwards. Red to yellow, black to blue.....
Still need some help on the voltmeter though. Anyone have a link to the battery break-in procedure? I haven't searched yet, but will... |
|
|
|
|
05-13-2010, 01:53 AM
|
#4 |
|
......................
Join Date: Apr 2009
Location: FT Lauderdale FL.
Posts: 16,416
|
Here you go --
 NEW BATTERY BREAK-IN PROCEDURE: Following proper break-in procedure can increase the strength and the useful life span of your new batteries. New batteries are initially about 75% of their full strength. The following procedure will insure they reach their full potential. The 1st 10 to 20 complete charge/discharge cycles are critical to insure they reach 100%. New batteries should be charged before use and thereafter as follows: Plug the charger in and leave it alone until charger shuts off by itself. Then drive to discharge the batteries to 75% battery pack capacity (see chart) Plug the cart back in and repeat the charge cycle.......It is very important you let it charge until it is completely done. Repeat this for the first 10 - 20 cycles......by the 12th cycle you will notice a difference in power, speed, and run-time.........I have never had a customer say they have not noticed the increase. Most importantly, NEVER run the battery pack down below 50% of capacity throughout their entire life. Never leave the batteries in a state of discharge for extended periods of time. Recharge the pack once a week if the cart is sitting idle or in storage. And when in doubt, recharge it. During the break-in procedure, keep an eye on the water levels. T can take 12 hours or more for the 1st few Charging times. These extended charge cycles may evaporate some of the water. ( use distilled water only ) As the batteries break in you will notice the charge time gets shorter. Eventually going from 12 to 5-6 hours per recharge. ONCE A MONTH: Routine maintenance is the 2nd most important thing to insure you get the most use out of your new battery pack. It is critical that you get into a routine of spending 10 - 15 minutes a month to keep the cable connections clean and check the water levels. Proper water level is critical. Dry batteries die quickly. Keep the Distilled Water level up to the bottom of the fill hole sleeve or a half inch above the lead plates. Do not fill to the top. Use a hard nylon brush to remove any visible corrosion. Carefully check that all of the cable connections are tight. Loose connections cause arching which will melt the soft lead terminals. Spray-on Battery Terminal Protector is available from the auto parts store and greatly reduces corrosive build up. I hope this helps you get the most use possible out of your battery investment. Read more about new battery break-in procedures here: NEW BATTERIES? http://www.buggiesgonewild.com/electric-club-car/17096-battery-breakin-break-procedure-procedures.html?highlight=Battery+Breakin |
|
|
|
|
05-13-2010, 04:58 AM
|
#5 |
|
Not Yet Wild
Join Date: May 2010
Location: Paducah, KY
Posts: 55
|
Thank you sir!
|
|
|
|
|
05-16-2010, 10:10 AM
|
#6 |
|
Not Yet Wild
Join Date: Apr 2009
Posts: 18
|
What solenoid are you using? It looks awful small for that 500 amp control. I have the same setup but used the mzj-400 solenoid recommended by alltrax for use on 500-600 amp controls. Something you may want to look into.
|
|
|
|
|
05-16-2010, 07:52 PM
|
#7 |
|
Not Yet Wild
Join Date: May 2010
Location: Paducah, KY
Posts: 55
|
i think it's the mzj-200. It's rated to 800A.
|
|
|
|
|
|
||||||
|
|
 Similar Threads
|
||||
| Thread | Forum | |||
| DCX500 interesting issue | Electric Club Car | |||
| Anyone have DCX500 install pics??? | Electric EZGO | |||
| Installed New Controller | Electric EZGO | |||
| alltrax dcx500 | Golf Carts and Parts | |||


 Linear Mode
