
|
|
|||||||
| Electric EZGO Electric EZ GO Marathon, Medalist, TXT and RXV. |
  |
|
|
Thread Tools | Display Modes |
 02-28-2015, 01:23 PM
|
#1 |
|
Not Yet Wild
Join Date: Feb 2015
Posts: 8
|
I just purchased a 36volt contactor for my 95 EZ Go and Im having trouble with the installation converting it from the rotary switch. My cart has 5 cables attached to the rotary switch, not 4 like are shown in the instructions. Mine has S1,S2,A2 and two M- cables.
It appears that the S1 connects to terminal 5 and S2 connects to terminal 8. Where should I connect A2? What about the two M- cables ? 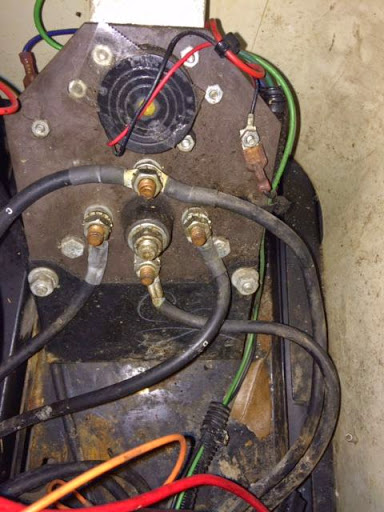 |

|

|
 Today Today
|
|
|
__________________
This advertising will not be shown in this way to registered members. Register your free account today and become a member on Buggies Gone Wild Golf Cart Forum |
|
|
02-28-2015, 02:11 PM
|
#2 |
|
Happy Carting

 Join Date: Dec 2007
Location: Southern California
Posts: 73,406
|
Copy and pasted from my response to your email moments ago.....
Make your cart match this diagram attached. (install directions) This will be best. If your controller has A2 terminal you will not use it. No cables to controller A2. |
|
|
|
|
02-28-2015, 04:56 PM
|
#3 |
|
Happy Carting
Join Date: Dec 2007
Location: Southern California
Posts: 73,406
|
Here is the early diagram with 4 large posts on the controller, the majority of these carts were 3 blade shown also here
|
|
|
|
|
03-01-2015, 11:19 AM
|
#4 |
|
Not Yet Wild
Join Date: Feb 2015
Posts: 8
|
The photo shows my old switch before I began the upgrade.
3 o’clock is S2 which I’ve connected to terminal 8 of the contactor 9 o’clock is S1 which I’ve connected to terminal 5 of the contactor 6 o’clock position wire goes to terminal 4 of the contactor 12 o’clock position are two wires with one going to the controller to A2 and the other going to the motor A2 Here’s what I did with the two 12 o’clock cables: Scotty B told me to remove the one that goes back to the controller terminal A2 since it's not used in the installation. He said that my cart had a 4 terminal controller that was not used for very long. I connected the remaining 12 o’clock cable to terminal 3. It still would not work until I reconnected the green wires that were apart from when I removed the old switch. That’s it. It seems to run faster now too. |
|
|
|
|
03-02-2021, 11:16 PM
|
#5 |
|
Not Yet Wild
Join Date: Apr 2020
Posts: 3
|
[QUOTE=scottyb;1125746]Copy and pasted from my response to your email moments ago.....
Make your cart match this diagram attached. (install directions) This will be best. If your controller has A2 terminal you will not use it. No cables to controller A2.[/QU alltrak you have one with the wiring of 5091 Curtis/Albright 400 Amp Single Pole Double Throw Contactor. my F/R switch have 4 prongs on it .. wires coming from the pedal plug into some more wired an im not sur where they go .. |
|
|
|
|
|
||||||
| Thread Tools | |
| Display Modes | |
|
|
 Similar Threads
|
||||
| Thread | Forum | |||
| reversing contactor | Electric EZGO | |||
| Reversing Contactor voltage | Electric golf carts | |||
| reversing a series motor without a reversing contactor? | Electric EZGO | |||
| Reversing switch or contactor? | Electric Club Car | |||
| Biggesst Reversing Contactor | Extreme DC! | |||


 Linear Mode
